Scaling applications with Openshift - A real Use Case Scenario
One of the last days of this year, one of the last job travels that give me some
time to write a post.
This year I’ve made a full immersion on kubernetes and inhered technologies like
openshift as container orchestration platform and I have to say that definitively
I’ve learned tons of fun things on cloud native software.
With the help of this kind of tools the software development cycle is becoming
more agile, more flexible, you can deploy applications thousands of times without
breaking the service you’re offering to your customers, rolling out new (and maybe
different version or just a % of traffic) of a deployment in no time;
One of the first project I’ve re-designed using openshift as orchestration platform
is nextcloud.
First of all, the design of some microservices in a containerized environment
must start with a couple of considerations about the software itself:
- What are the components involved: you must identify all the microservices
- What Scalability requirements do you have
- Do you REALLY REALLY need to containerize everything
- How do you plan the application building
- Think about some rollout strategies: blue/green, canary deployment or other well-known approaches
As I said before, the Use case I would like to tell in this post is related to nextcloud, which is, of course, designed to run as a private sync and share system that allows scalability not as a single instance but as several, federated little instances (I think this is due to the fact that this kind of application is optimized for Departments).
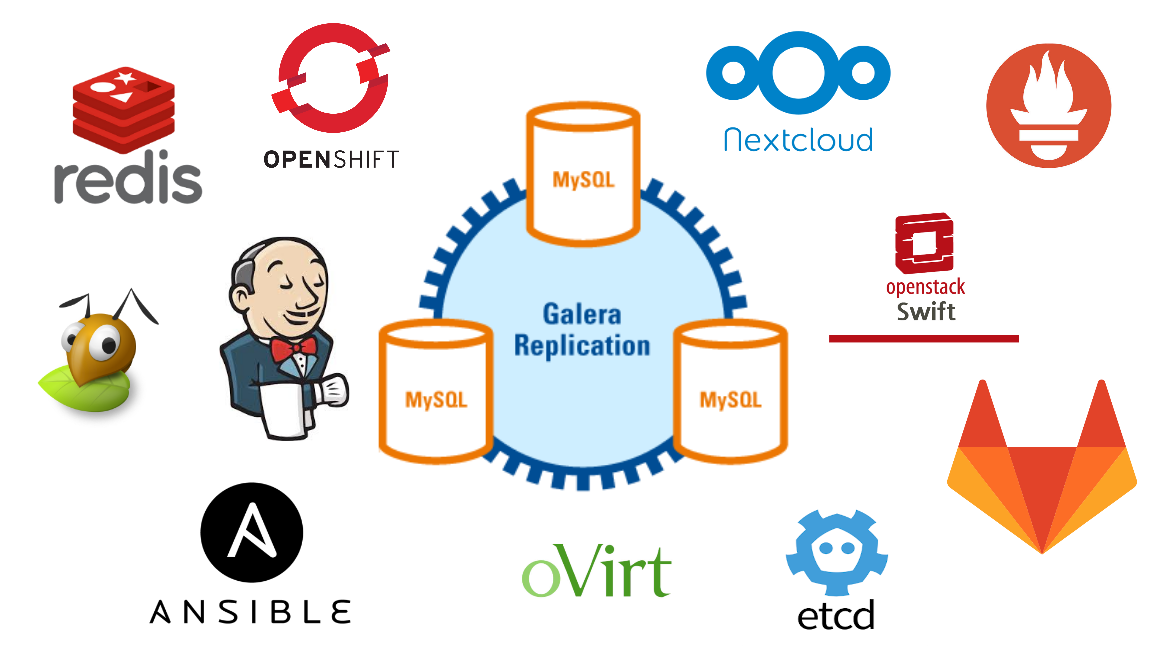
The components
Here some technologies involved in the design of this infrastructure, starting from the virtualization layer based on oVirt, to the external components like ETCD or Swift as object storage to support the application.
Images
The basic idea was to create *billions* of stateless instances of nextcloud with no persistent data, using a s3 backend based on Ceph as primary storage and an etcd as the brain containing all the required configuration parameters to make the application up & running without affecting the user experience (from one side) and making the life easier to the ops team when some changes in production are requested. So, starting from this idea the first requirements were established:
- Integration with an SSO external service (to avoid pods to process this operation and to make SSO system scalable stand-alone);
- S3 as primary storage
- Pods as stateless instances
- Keep database as external service to attach to nextcloud
Virtualization infrastructure
In order to simplify the deployment process of an Openshift production-ready architecture,
Red Hat has given some best practices making this job easier from a design point of view.
In my team we decided to use the oVirt platform as virtualization layer, so, as depicted
in the image below, we have applied this (high level) schema to build the cluster:
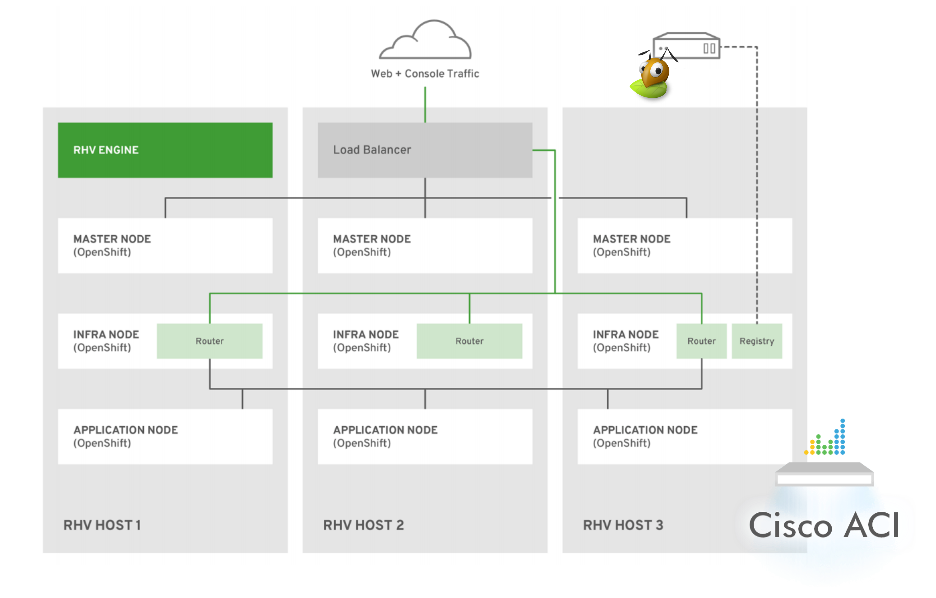
- OpenShift Masters distributed across multiple Red Hat Virtualization hypervisor nodes utilizing anti-affinity groups (this rule is applied for infra nodes as well);
- Infrastructure nodes (both compute and infra for routers) distributed across
multiple hypervisors; Routers and Registry pods are also scaled using
ansible playbooks which are the official and default way to make any cluster
change.
Speaking of numbers, today the configuration consists of one bastion instance, three OpenShift master instances, seven OpenShift infrastructure instances to shard ingress traffic based on the role of the pods deployed, and ~80 OpenShift application compute nodes spread across oVirt hypervisors.
Note that the image above is just a logical view of the cluster in order to give an idea of the design and how it’s built.
Application Structure
The application developed on top of openshift is based on few, core components:
-
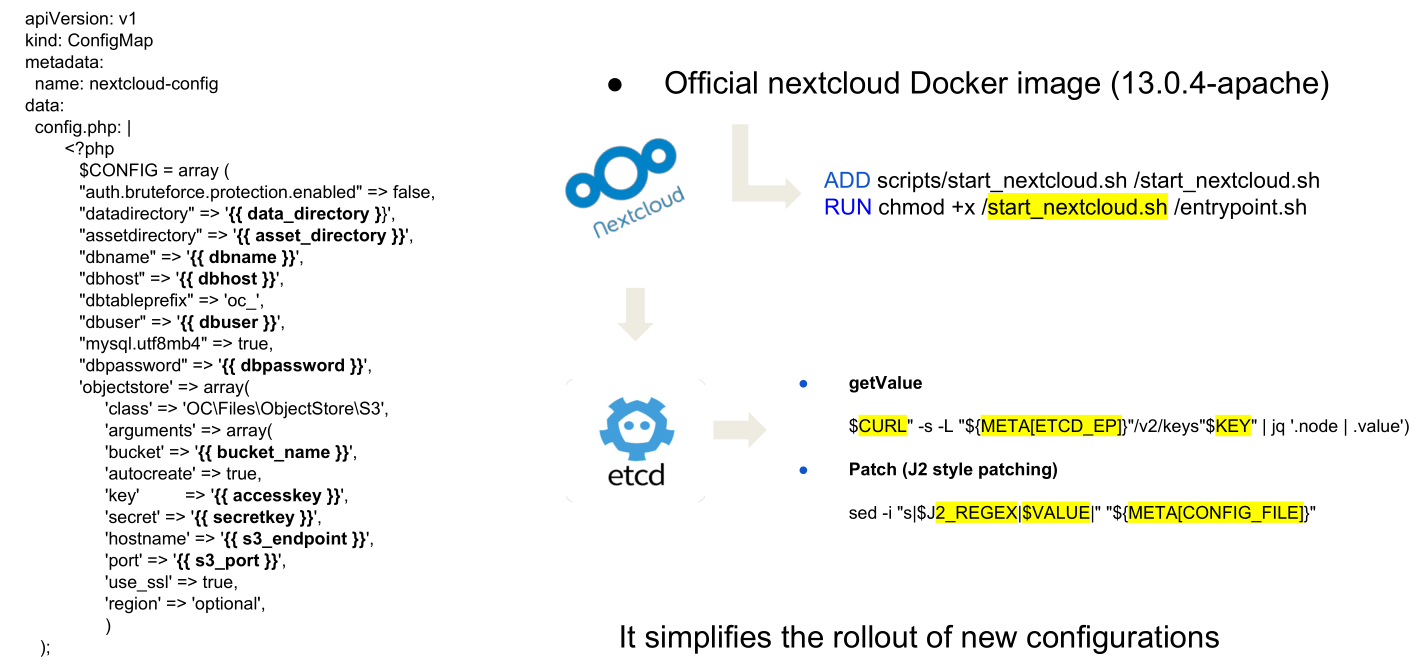
An Etcd that stores all the application configuration: as said before, pods are stateless entity, so one of the first constraints is to patch the config.php of the nextcloud in order to reflect the real application configuration;
-
An image buildconfig to trigger all the docker builds and make all the required customizations on the official base image (based on the nextcloud-apache);
- Few configmaps to store some configurations (and store some variables that could be change);
- Some secrets to store all the config needed to connect the pods with openstack swift services and to authenticate against the CI cluster
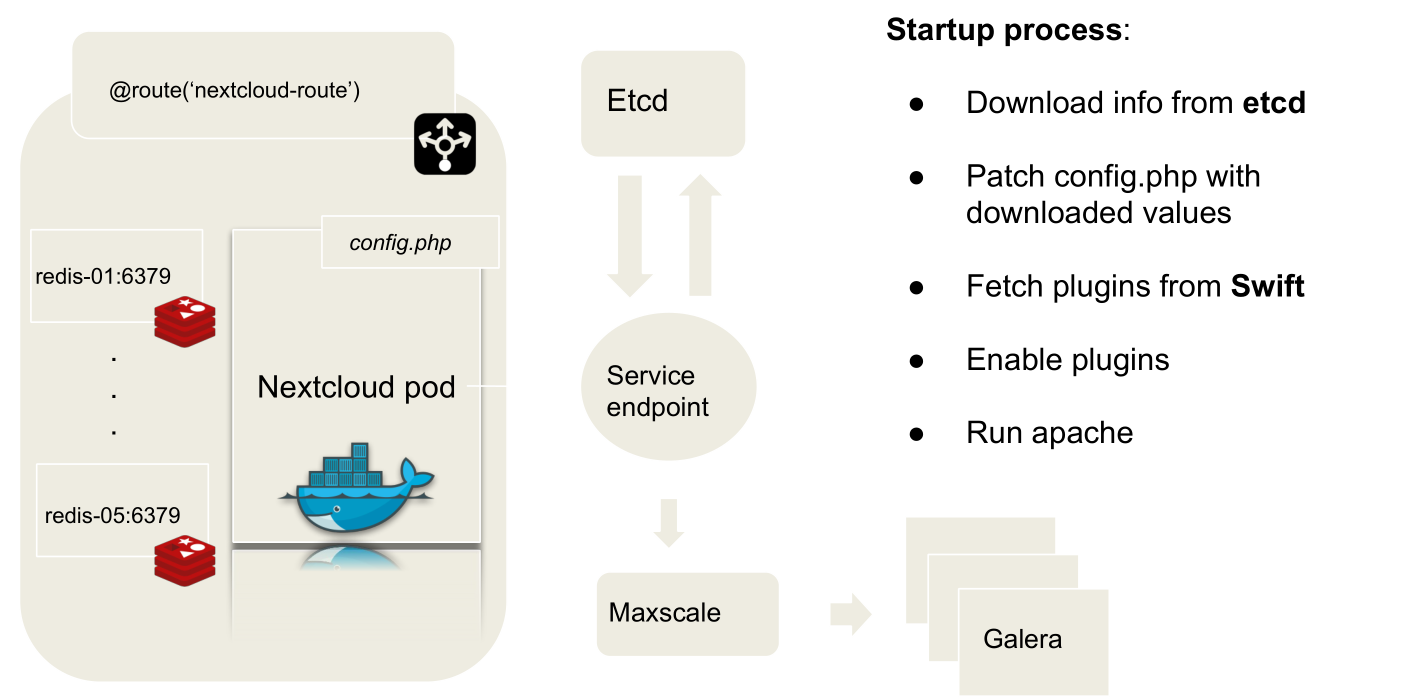
The POD Lifecycle
Keeping the official nextcloud image, we just create a Dockerfile that install all the components needed to interact with the openstack Swift containers (that is one of the last steps of the pod starting phase) and we finally customize the start script of the pod: this allowed us to better control the pod starting phase and manage its whole lifecycle.
Building the application: Phase Zero
First of all, you can simply checkout the source code with the following:
$ git clone https://github.com/fmount/nextcloud-okd
Once this step is done, it’s time to start creating all the required components starting from the etcd service.
Inside the $PWD/scripts section an etcd-cli.go golang script is provided to help users interact with the Application Etcd Service (you can find it inside its namespace) that is routed at:
http://etcd.<YOURDOMAIN>
To check if it’s working properly, try to make a curl on the health key or use
the classic etcdctl cli to make some queries.
To register or modify the nextcloud keys with new configuration values, you can
just edit the nextcloudrc ini file provided and run the script: in this way
the start_nextcloud_script will be able to substitute all the retrieved values,
giving more flexibility to the stateless nextcloud installation because we can
push the new configuration each time we need to do it.
Once the nextcloudrc is customized as desidered, just run:
$ go run etcd-cli.go
It will populate all the keys in the etcd tree, making theme available to the future instances.
Starting from this, the basic template of the config.php looks like the following:
        <?php
          $CONFIG = array (
          "log_type" => "syslog",
          "datadirectory" => "<data_directory>",
          "updatechecker" => false,
          "check_for_working_htaccess" => false,
          "asset-pipeline.enabled" => false,
          "assetdirectory" => '<asset_directory>',

          "apps_paths" => array(
             0 =>
              array (
                  'path'=> '<apps_directory>',
                  'url' => '/apps',
                  'writable' => true,
              ),
              1 =>
              array (
                  'path' => '<apps_directory>',
                  'url' => '/apps-appstore',
                  'writable' => true,
              ),
            ),

          'objectstore' => array(
          'class' => 'OC\Files\ObjectStore\S3',
          'arguments' => array(
              "bucket" => "<bucket_name>",
              'autocreate' => true,
              'key'    => '<accesskey>',
              'secret' => '<secretkey>',
              'hostname' => '<s3_endpoint>',
              'port' => '<s3_port>',
              'use_ssl' => true,
              'region' => 'optional',
              // required for some non amazon s3 implementations
              'use_path_style'=> true
              ),
            )
         );
and the start script of the Pod just download data values from etcd and replace them in the correct position defined by the placeholder keys.
So, before starting to worry about the nextcloud application, the first step is to create the etcd environment to serve the nextcloud application keys:
$ oc new-project etcd

$ for i in $(ls ~/projects/openshift-apps/etcd/ | awk '/yml/ {print $0}');\
  { oc create -f $i -n etcd; }
At the end of this process you will have an etcd tree up & running and ready to serve all the nextcloud instances requests.
CREATE THE STAGING ENVIRONMENT
Speaking using the Openshift terminology, the application is composed by three
projects (the equivalent of kubernetes namespaces): the first we describe here
is the staging environment.
Assuming you want to start this scenario, you need first to create all the
needed configmaps, secrets and jenkins pipelines:
$ oc create -f nextcloud_configmap.yml
$ oc create -f modsecurity_configmap.yml
$ oc create -f nextcloud_apache_mpm_configmap.yml
Then, create the swiftrc secret to make all pods able to interact with swift (where plugins reside):
$ oc create -f nextcloud_swiftrc_secret.yml
After the creation of all the objects described above, we can start to build the imagestreams:
$ oc create -f nextcloud_buildconfig.yml
And after the build is finished:
$ oc new-app -f nextcloud_dc.yml
CREATE Q/A NAMESPACE
As we’ve done in the paragraph above, we can add two more stages to the application and using routes and tools like istio administrators can develop and set rules to define which service expose to the end users.
Using the same approach, we can create a Q/A namespace:
$ oc new-project nextcloud-qa

$ cd ${NEXTCLOUD_QA_NAMESPACE}
$ oc create -f nextcloud_configmap.yml
$ oc create -f modsecurity_configmap.yml
$ oc create -f nextcloud_apache_mpm_configmap.yml
$ oc create -f nextcloud_configmap.yml
$ oc create -f nextcloud_pipeline_qa.yml
$ oc new-app -f nextcloud_dc.yml
Now we need to update the deploymentconfig trigger to make it sensitive to a new tag triggered by the new build on the staging namespace:
$ oc set triggers dc/nextcloud-qa --from-image=nextcloud-qa/nextcloud-build:qa-ready -c nextcloud -n nextcloud-qa
One of the most important rules in this game is help jenkins to make everything automated: to do this we make it admin of the nextcloud-staging namespace, so it will have rights to view any resource in the project and modify them except for the quota.
$ oc policy add-role-to-user admin system:serviceaccount:nextcloud-staging:jenkins -n nextcloud-staging
Note:
During the first cycle we have to trigger a new build manually:
$ oc start-build nextcloud-build -n nextcloud-staging
and then force manually the creation of the tag for the Q/A namespace running:
$ oc tag nextcloud-staging/nextcloud-build:latest nextcloud-qa/nextcloud-build:qa-ready
GO LIVE ON PRODUCTION ENVIRONMENT
Passing from the Q/A or Staging environment to the production one follows the
same rules used to pass from the staging to the Q/A, using triggers to define
when an image or a configuration is ready to be deployed in another environment,
and finally using the same triggers to run the DeploymentConfig and create a
new build.
Of course, the job of promoting images through stages remain owned by the jenkins
pipelines, so it’s really important to check the quality of the pipelines
because the result of their job is reflecting to the deployments (from staging
to production).
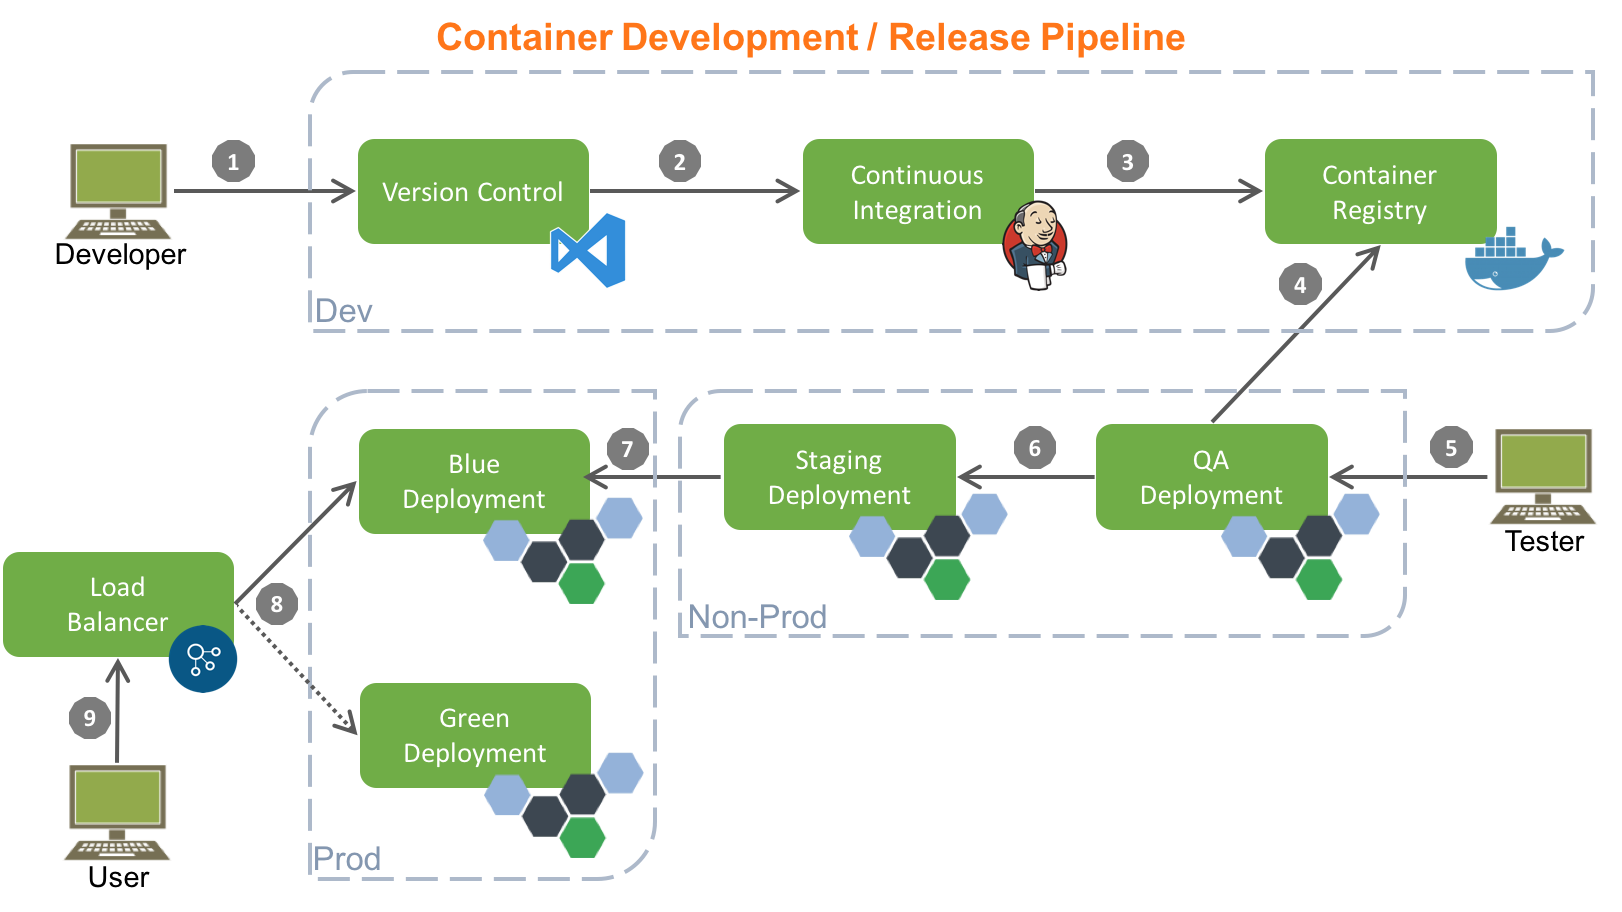
The schema above is definitively the approach we used, and we’ve tried to translate all the theoretical best practices of the CI in a concrete deployment strategy. Finally, in order to minimize the downtime during the application rollout, the blue/green approach has been adopted.
So, from a practical point of view:
$ oc new-project nextcloud-prod
$ oc create -f nextcloud_configmap.yml
...
...
$ oc new-app -f nextcloud_dc.yml
As we’ve done before, the production environment is built triggering the ImageChange/ConfigChange
on the deploymentconfig using a specific image tag (in this case prod-ready).
To avoid errors related to the automation tool and the provided pipeline, after
the test phase the user MUST trigger the rollout of the application through
a user input requested by the Jenkins pipeline that manage in depth the flow of
the CI/CD from the dev namespace to the production one: this behaviour of course
could be changed as needed.
To make jenkins able to handle triggers on deploymentconfig and tag on ImageStream,
as for the other projects the correct role was added to the Jenkins user:
$ oc policy add-role-to-user admin system:serviceaccount:nextcloud-qa:jenkins -n nextcloud-prod
Then explicitly enable the trigger on the dc:
$ oc set triggers dc/nextcloud-prod --from-image=nextcloud-prod/nextcloud-build:prod-ready -c nextcloud -n nextcloud-prod
and finally like done before we can manually force the first deployment running:
$ oc tag nextcloud-qa/nextcloud-build:qa-ready nextcloud-prod/nextcloud-build:prod-ready
From now each phase is automated except for the Q/A pipeline that right now we
need to start manually to prevent any kind of error because this represents
the last section of the flow and end with the rollout of the application
in production.
Some scaling considerations
For monitoring and alerting purposes, as well as for anomaly detection goals, we
used the metrics, tools and api exposed by Openshift (I’m talking about prometheus,
hawkular, heapster and grafana as frontend).
With an application that could host several thousands of users, the combination
of all these elements become the most powerful way to keep control of the entire
application lifecycle.
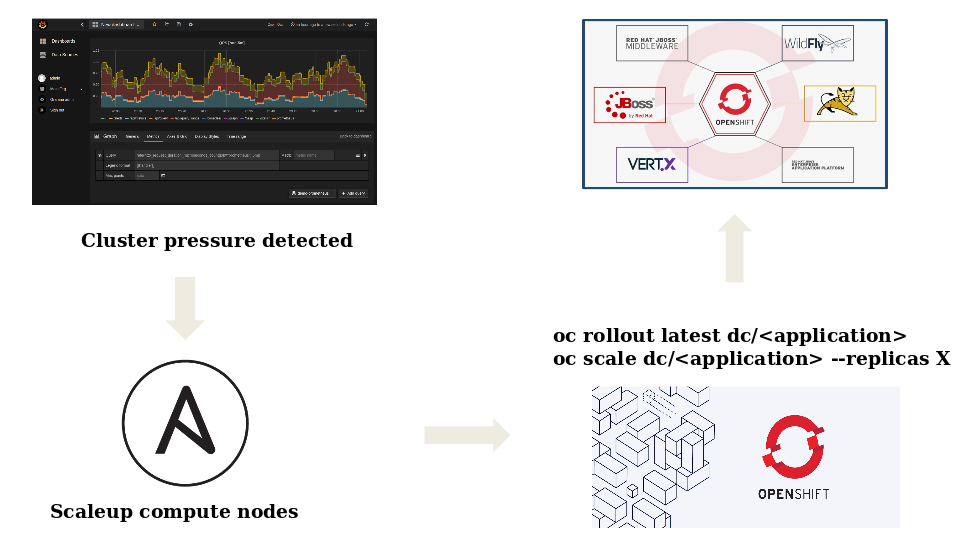
As depicted in the image above, according to some pre-defined metrics, when a
cluster pressure is detected, a scaleup ansible playbook is run on the
openshift cluster: in this phase, the virtualization layer export a value that
make ansible aware of the free resources, and according to these values
new compute nodes are deployed and joined to the openshift environment.
As a result of this process the application (that has specific cpu and memory
requirements in terms of requests and limits) is scaled by its scheduler
that is able to watch this kind of resources.
The custom kubernetes scheduler is responsible to detect the cluster pressure
and compute the number of instances needed to be deployed.
If you want to start experimenting with the k8s basics and build a custom scheduler,
here
is a good starting point.
Counclusion
Openshift and related technologies are, of course, the best platforms to put up
and running an environment (mainly web applications) in no time and reduce a lot
the distance between the pure code (Git) to a production environment.
One of the most important things I’ve learned during this journey inside containerized
and orchestrated applications is that you always have to think about microservices,
layered and modular applications, but sometimes is really important to understand
the limit of these technologies because they cannot substitute what you’ve learned
until now.
Sometimes you just need to put them aside the classic way of design good software,
use them to become more agile in some tasks that before weren’t automated and use
them to make some tasks more optimized and efficient with the less effort you can
spend on it.